SETTING UP SITE-TO-SITE VPN TO AWS VPC
Step-by-step guide
- Create VPN config file at AWS VPC Console
- Download File.
- Edit it to make it work with Sophos.
- Take a note of the IP addresses of the two VPN tunnels at AWS and create two BGP Neighbours.
- Add firewall rules to allow AWS network to access Sophos Internal network.
- Add Sophos UTM as firewall as BGP server and enable BGP service.
- Import AWS config file and enable tunnel.
- Enable internal network to access AWS security groups for servers.
- Test.
At the AWS end, go to Services, VPC, then:
1. Create VPN config file at AWS VPC Console
Create a Customer Gateway
-
Open the Amazon VPC console at by opening https://console.aws.amazon.com and then Select Networking and Content Delivery > VPC.
-
In the navigation pane, click Customer Gateways, and then click Create Customer Gateway.
-
In the Create Customer Gateway dialog box, complete the following and then click Yes, Create:
-
In the Name tag field, optionally enter a name for your customer gateway. Doing so creates a tag with a key of
Nameand the value that you specify. -
Select the routing type from the Routing list – Border Gateway Protocol (BGP) Autonomous System Number (ASN) in the BGP ASN field. use 65000, go to http://whatsmyip.org to discover your Customer Gateway IP address.
-
Create a Virtual Private Gateway
To create a virtual private gateway
-
In the navigation pane, click Virtual Private Gateways, and then click Create Virtual Private Gateway.
-
You can optionally enter a name for your virtual private gateway, and then click Yes, Create.
-
Select the virtual private gateway that you created, and then click Attach to VPC.
-
In the Attach to VPC dialog box, select your VPC from the list, and then click Yes, Attach.
Enable Route Propagation in Your Route Table
To enable instances in your VPC to reach your customer gateway, you must configure your route table to include the routes used by your VPN connection and point them to your virtual private gateway. You can enable route propagation for your route table to automatically propagate those routes to the table for you.
For static routing, the static IP prefixes that you specify for your VPN configuration are propagated to the route table after you’ve created the VPN connection. For dynamic routing, the BGP-advertised routes from your customer gateway are propagated to the route table when the status of the VPN connection is UP.
To enable route propagation
-
In the navigation pane, click Route Tables, and then select the route table that’s associated with the subnet; by default, this is the main route table for the VPC.
-
On the Route Propagation tab in the details pane, click Edit, select the virtual private gateway that you created in the previous procedure, and then click Save.
Note
Update Your Security Group to Enable Inbound Full Access for your internal network (192.168.0.0/24 in our case)
Create a VPN Connection and Configure the Customer Gateway
To create a VPN connection and configure the customer gateway
-
In the navigation pane, click VPN Connections.
-
Click Create VPN Connection.
-
In the Create VPN Connection dialog box, do the following, and then click Yes, Create:
-
In the Name tag field, optionally enter a name for your VPN connection. Doing so creates a tag with a key of
Nameand the value that you specify. -
Select the virtual private gateway that you created earlier.
-
Select the customer gateway that you created earlier.
-
Select Border Gateway Protocol (BGP):
-
As your VPN router supports BGP, select Dynamic (requires BGP).
-
-
-
It may take a few minutes to create the VPN connection. When it’s ready, select the connection, and then click Download Configuration.
-
In the Download Configuration dialog box, select the vendor, platform, and software that corresponds to your customer gateway device or software, and then click Yes, Download.
2. Download File
3. Edit file to make it work with Sophos.
Our file is below:
Make a note of the Tunnel Outside addresses at AWS end as we will need these to be our BGP neighbours – I have put them in blue.
Our external IP address is in red. You need to edit the file and change it (twice) to our internal firewall IP address – 192.168.0.254.
<?xml version=”1.0″ encoding=”UTF-8″?><!–Amazon Virtual Private Cloud Configuration
To configure this VPN, go to the WebAdmin for your security gateway. Click “Site-to-site VPN”,
then click “Amazon VPC”. On the “Setup” tab, locate the “Import via Amazon VPC configuration”
section, then select this file and click “Apply”.
XSL Version: 2009-07-15-1119716–><vpn_connection id=”vpn-95b15cfc”>
<customer_gateway_id>cgw-madeupname</customer_gateway_id>
<vpn_gateway_id>vgw-madeupname</vpn_gateway_id>
<vpn_connection_type>ipsec.1</vpn_connection_type>
<ipsec_tunnel>
<customer_gateway>
<tunnel_outside_address>
<ip_address>123.123.123.123/ip_address>
</tunnel_outside_address>
<tunnel_inside_address>
<ip_address>169.254.255.89</ip_address>
<network_mask>255.255.255.252</network_mask>
<network_cidr>30</network_cidr>
</tunnel_inside_address>
<bgp>
<asn>65000</asn>
<hold_time>30</hold_time>
</bgp>
</customer_gateway>
<vpn_gateway>
<tunnel_outside_address>
<ip_address>50.50.50.50</ip_address>
</tunnel_outside_address>
<tunnel_inside_address>
<ip_address>169.254.255.88</ip_address>
<network_mask>255.255.255.252</network_mask>
<network_cidr>30</network_cidr>
</tunnel_inside_address>
<bgp>
<asn>7224</asn>
<hold_time>30</hold_time>
</bgp>
</vpn_gateway>
<ike>
<authentication_protocol>sha1</authentication_protocol>
<encryption_protocol>aes-128-cbc</encryption_protocol>
<lifetime>28800</lifetime>
<perfect_forward_secrecy>group2</perfect_forward_secrecy>
<mode>main</mode>
<pre_shared_key>FTta4BZ82qA4cooDgwDWmcpOv2MxSYtl</pre_shared_key>
</ike>
<ipsec>
<protocol>esp</protocol>
<authentication_protocol>hmac-sha1-96</authentication_protocol>
<encryption_protocol>aes-128-cbc</encryption_protocol>
<lifetime>3600</lifetime>
<perfect_forward_secrecy>group2</perfect_forward_secrecy>
<mode>tunnel</mode>
<clear_df_bit>true</clear_df_bit>
<fragmentation_before_encryption>true</fragmentation_before_encryption>
<tcp_mss_adjustment>1387</tcp_mss_adjustment>
<dead_peer_detection>
<interval>10</interval>
<retries>3</retries>
</dead_peer_detection>
</ipsec>
</ipsec_tunnel>
<ipsec_tunnel>
<customer_gateway>
<tunnel_outside_address>
<ip_address>123.123.123.123</ip_address>
</tunnel_outside_address>
<tunnel_inside_address>
<ip_address>169.254.255.87</ip_address>
<network_mask>255.255.255.252</network_mask>
<network_cidr>30</network_cidr>
</tunnel_inside_address>
<bgp>
<asn>65000</asn>
<hold_time>30</hold_time>
</bgp>
</customer_gateway>
<vpn_gateway>
<tunnel_outside_address>
<ip_address>50.50.50.49</ip_address>
</tunnel_outside_address>
<tunnel_inside_address>
<ip_address>169.254.255.86</ip_address>
<network_mask>255.255.255.252</network_mask>
<network_cidr>30</network_cidr>
</tunnel_inside_address>
<bgp>
<asn>7224</asn>
<hold_time>30</hold_time>
</bgp>
</vpn_gateway>
<ike>
<authentication_protocol>sha1</authentication_protocol>
<encryption_protocol>aes-128-cbc</encryption_protocol>
<lifetime>28800</lifetime>
<perfect_forward_secrecy>group2</perfect_forward_secrecy>
<mode>main</mode>
<pre_shared_key>_NTSKNZ9gGySZjVvBYeKJjUTzQ4lp_s3</pre_shared_key>
</ike>
<ipsec>
<protocol>esp</protocol>
<authentication_protocol>hmac-sha1-96</authentication_protocol>
<encryption_protocol>aes-128-cbc</encryption_protocol>
<lifetime>3600</lifetime>
<perfect_forward_secrecy>group2</perfect_forward_secrecy>
<mode>tunnel</mode>
<clear_df_bit>true</clear_df_bit>
<fragmentation_before_encryption>true</fragmentation_before_encryption>
<tcp_mss_adjustment>1387</tcp_mss_adjustment>
<dead_peer_detection>
<interval>10</interval>
<retries>3</retries>
</dead_peer_detection>
</ipsec>
</ipsec_tunnel>
</vpn_connection>
4. Take a note of the IP addresses of the two VPN tunnels at AWS and create two BGP Neighbours.
In our case 50.50.50.50 and 50.50.50.49 –
Logon to Sophos UTM > Interfaces & Routing > Border Gateway Protocol > Neighbour > New BGP Neighbour – create two BGP neighbours with AS or 65000 and IP addresses above.
5. Add firewall rules to allow AWS network to access Sophos Internal network.
Logon to Sophos UTM > Network Protection > New Rule

Where AWS1 and AWS2 are the newly defined BGP routers from Step 4 and AWS_VPC is VPC network – in our case 172.31.0.0/16 – found here:
https://console.aws.amazon.com/vpc/home?region=us-east-1#vpcs: (assuming you are in the same region)
6. Add Sophos UTM as firewall as BGP server and enable BGP service.
Logon to Sophos UTM > Interfaces & Routing > Border Gateway Protocol > in Global, select BGP System, add the AS number of 65000, router ID or 192.168.0.254 and add External (WAN) (Network) and Internal (Network) as the networks and enable BGP by turning on the big green button.
7. Import AWS config file and enable tunnel.
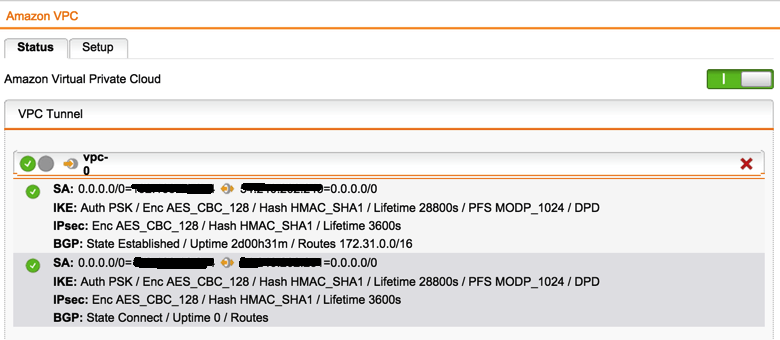
Take the config file you edited in step 3 > Logon to Sophos UTM > Site-to-Site VPN > Amazon VPC > Setup > Import via Amazon VPC configuration > Upload your file. Don’t specify a remote network and click Apply. When you go to Status it should be green. It takes a few minutes to come up properly.

Notice BGP in the top (active) tunnel shows the route of the VPC subnet and uptime.
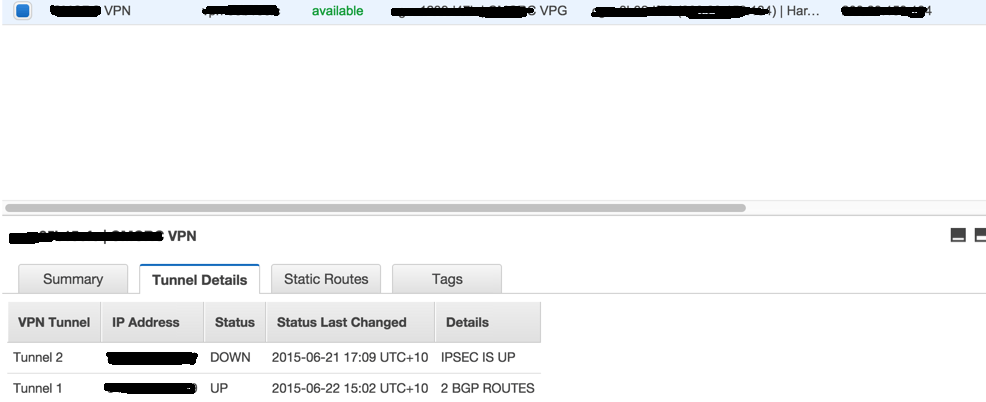
At the AWS end:
https://console.aws.amazon.com/vpc/home?region=us-east-1#vpns: (assuming you are in the same region)
Notice Tunnel 1 shows BGP is up and Link status is up – that means you are good to go. If it is not up, you need to do some troubleshooting.

8. Enable internal network to access AWS security groups for servers.
In the AWS Console, go to Services > EC2 and then security groups
To add rules to your security group to enable inbound for your internal network:
-
In the navigation pane, click Security Groups, and then select the default security group for the EC2 instances you have (and all Security Groups you want to allow VPN access).
-
On the Inbound tab in the details pane, add:
9. Test
You should now have a working Site-to-Site VPN between your Sophos UTM and AWS.
References
AWS: VPN VPN setup Guide
https://docs.aws.amazon.com/AmazonVPC/latest/UserGuide/VPC_VPN.html
Sophos: KB120922:
https://www.sophos.com/support/knowledgebase/120922.aspx
AWS: VPN Tunnel Troubleshooting
https://aws.amazon.com/premiumsupport/knowledge-center/vpn-tunnel-troubleshooting/

